news

(New!) Interaction Tests, Mocks & Refactoring in Embedded Software

ClassImage2b.jpg

We’d like you to know that our second course is now available.

Wait. The new course is available? Seriously? It’s been like forever.

It has been forever, but, yes, the new course is available right now. It was a tremendous amount of work, and a whole lot of life happened during its development. Thank you so much for your patience and restraining your frustration.

Can I Get A Discount Because I’m Awesome?

Yes, you certainly can! The latest discounts are always listed on the course description page here.

What exactly are you launching in this next course?

This next course builds on the first. In the first course we introduced test-first development and state-based testing. This course teaches interaction-based testing with stubs and mocks, design patterns for testability, and refactoring supported by your test suite.

We present all the material in the new course through a full, real-world project that demonstrates all the real stuff you will encounter in your real work, start-to-finish. We’ve provided the entire development environment prepackaged for you so you can get started right away.

This new course is nearly seven hours of video material — almost three times that of the first course. It’s like binge-watching mad science. Plus, there’s a variety of text-based lectures, homework, quizzes, and all manner of supplemental materials.

And, in the end — if you choose to obtain the optional hardware — you’ll even have a tool that could be useful in your real work.

Now what?

  1. Redeem your discounted enrollment!

  2. Please message us with feedback or problems. You are the first to see this material. Help us find bugs and point out anything needing clarification.

  3. When you have completed the course please rate it and let your friends and colleagues know about it.

  4. Take over the world! Mwuuuhahaha!

Thank you again for your long-suffering and support all along the way.

Dr. Surly’s Minions,

Mark & Mike

New Releases!

0901191256a.jpg

Finally, we have new releases of all the main tools! Thank you VERY much to everyone who has contributed (and continues to contribute) to these projects. You have no idea how much we appreciate all of your help!

  • Ceeding 0.29.0

  • CMock 2.5.0

  • Unity 2.5.0

This release is WAY overdue, and that’s on me. I’d like to discuss ideas for making a regular release schedule, as well as ideas for what the focus of upcoming releases should be. I have a head full of ideas… but I’m certainly not the only member of this community!

Are you an active member of the community and interested in being a part of that discussion? Fill this out:

Unity + Jumper = Embedded Software Unit Testing, The Easy Way

This article is reposted with permission of Jonathan Seroussi from Jumper. While Jumper isn't a project of ThrowTheSwitch, it has been designed to work well with Unity and is of interest to our readers. You can find the original article here. ]

Unity and Jumper Virtual Lab.png

Proper unit testing is a must for any software project. To allow unit testing for a software project the R&D team must write a testable, modular code — code that can be divided into self-contained units that can be tested. On top of making the code testable, embedded software developers must make sure their code is portable. On this blog post, we are going to demonstrate an easy way to have unit testing for embedded software. We’ve combined the Jumper Virtual Lab and the popular Unity Testing Framework by Throw The Switch.

The folks at ThrowTheSwitch are on a mission to unleash the powers of C for Embedded Systems without fearing the pitfalls of C. A flexible unit testing framework is a key component in responsible, test driver development.

Unity by ThrowTheSwitch is a superb unit testing framework for C. It’s lightweight, compiles on everything, has a ton of assertion options and connects nicely with CMock for easy full mocking support.

Once you’ve written your embedded code unit tests, there are 3 ways of running them.

  1. On target — run on the designated board or MCU. This works to a certain extent but setting up automation is a bit of a pain. Plus if you do end up automating it, make sure you don’t over-flash your ROM as it’ll get messed up sooner rather than later.
  2. On a PC — maintaining a proper Hardware Abstraction Layer and separating out the application code will make your application testable on an x86 or x86_64 machine. It’s awesome for app code, but you’ll need to mock pretty much everything outside of your application code.
  3. On an emulator — running on something like QEMU or the Jumper Virtual Lab allows full flexibility on what you mock or not, along with the benefit of easily plugging to a test automation framework.

We’re going to demonstrate how to run Unity-based unit tests on the Jumper Virtual Lab. We’re currently supporting the nRF52 by Nordic Semiconductor (STM32 support coming soon). The Virtual Lab is able to execute binaries that were compiled for the nRF52 without having to change anything about your code or how it compiles.

Install

To install Jumper Virtual Lab, go to this link and follow the installation instructions. You’ll need to create an account and download a token file, and then install a python module using pip. And that’s it! At this stage Jumper only works on Ubuntu 16, but Windows and Mac support is coming soon.

Running the sample

Download this sample and unzip it. Inside, you’ll find a pre_compiled folder and a source folder. For convenience, we’ll use the pre compiled option.

In your terminal, go to the pre_compiled folder and enter

jumper run -u -b unity.bin

After a few seconds, the following output will start printing onto your terminal:

Loading virtual device ………… Done

Virtual device is running
test/TestProductionCode.c:20:test_FindFunction_WhichIsBroken_ShouldReturnZeroIfItemIsNotInList_WhichWorksEvenInOurBrokenCode:PASS 
test/TestProductionCode.c:32:test_FindFunction_WhichIsBroken_ShouldReturnTheIndexForItemsInList_WhichWillFailBecauseOurFunctionUnderTestIsBroken:FAIL: Expected 1 Was 0
test/TestProductionCode.c:41:test_FunctionWhichReturnsLocalVariable_ShouldReturnTheCurrentCounterValue:PASS 
test/TestProductionCode.c:51:test_FunctionWhichReturnsLocalVariable_ShouldReturnTheCurrentCounterValueAgain:PASS 
test/TestProductionCode.c:60:test_FunctionWhichReturnsLocalVariable_ShouldReturnCurrentCounter_ButFailsBecauseThisTestIsActuallyFlawed:FAIL: Expected 0x00001234 Was 0x00005A5A
— — — — — — — — — — — 5 Tests 2 Failures 0 Ignored

FAIL

This test fails on purpose.

Pretty cool, right?

The Code

Let’s drill down to the code. In the sample zip, go to source/main.c. The main.c file includes standard usage of the unity framework. Let’s look at this code:

JumperIOtests.png

After calling some functions that use assertions in the sample/source/test/TestProductionCode.c, it’ll call int unity_code = UnityEnd(); to get the number of failed tests.

Here’s a cool feature of the Virtual Lab we designed for these case. The last line: jumper_sudo_exit_with_exit_code(unity_code); is used to stop the program execution and return an exit code to the process that executed the test. This is very useful when running the test through a CI tools like Jenkins and CircleCI.

Using jumper_sudo to terminate the test execution

To do that you’ll need to use Jumper’s exit function:

void jumper_sudo_exit_with_exit_code(uint32_t exit_code)

To add the jumper_sudo code, follow the these instructions:

  1. Get the Jumper Virtual Lab Addons library by cloning this git repo:
  2. Add #include "jumper.h" to your .c file.
  3. Add the jumper.h and jumper.c files from this library to your build.

And you’re set!

This post was based on the following link from the Jumper Virtual Lab documentation.

Trying out Jumper Virtual Lab, Part I: Getting to Blinky

This article is reposted with permission of Luca Ingianni. Luca specializes in bringing DevOps to the embedded world: improving both the lives of engineers and the quality of their products. While not specific to Unit Testing, it discusses a tool which might be useful to members of the ThrowTheSwitch.org community ]

I’m very excited to transfer the principles of DevOps to embedded software and the Internet of Things (gotta be buzzword-compliant), and new tools promise to get us closer to this goal.

A lot is happening in the embedded system tooling space right now; I’m hopeful that the methods used in embedded may finally catch up to the rest of software development.

A lot of startups explore new ways to aid in development, and make the difficult world of embedded development more welcoming.

Introducing Jumper Virtual Lab

Today, I want to introduce you to one such new, interesting tool: Jumper Virtual Lab As you read my discussion of it, keep in mind that Jumper Virtual Lab is still in beta, and various rough edges will certainly be smoothed out as the product is released.

This post will be the first in a small series, exploring Virtual Lab. As is custom in the embedded world, our first attempt will be to get a LED to blink.

Except, with a twist: first we’ll use a physical µC, and after that we’ll execute the exact same binary on Virtual Lab’s simulation, to find out if it actually works like the real thing.

What is it?

Virtual Lab is a hardware virtualisation solution for embedded systems. It allows to simulate microcontrollers to a degree that native code will run on these virtual devices.

This opens a range of possibilities:

  • Create virtual prototypes, and try your software under real-life conditions before physical prototypes have even been delivered
  • Create test scenarios which are otherwise hard to achieve: write to read-only memory, mess with data lines, pause and resume execution of an entire assembly (sensors and µC) without fearing desynchronisation, etc
  • Be unconstrained by number of prototypes: run multiple tests in parallel, afford all developers heaps of virtual devices to try things with
  • Execute at more than real-life speed, or skip in time, to accelerate tests
  • Simplify your CI/CD pipeline, by not having to rely on temperamental HiLs: turn system test into an all-software affair

Getting to Blinky

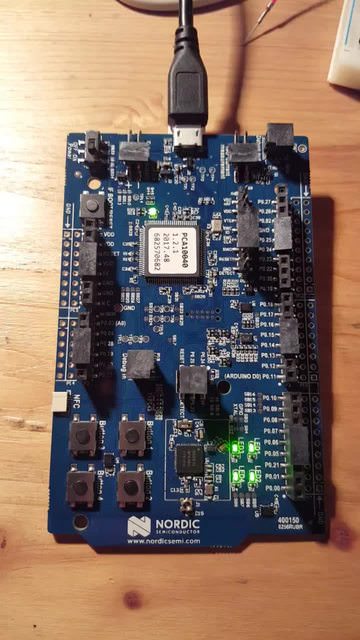
As promised, we’ll start by using real, proper hardware: the Nordic Semiconductors nRF52 ARM-based microcontroller.

We’ll use Nordic’s nRF52 DK development kit and the SDK’s blinky code example as the basis for our physical tests. Once we get our toolchain running, we’ll satisfy ourselves that Jumper can successfully run the same binaries in its simulation.

Creating the Blinky Binary

Just to make sure you understand my starting point, here’s an outline of the environment I used:

  • nRF5x SDK 14.2.0
  • GNU Am Embedded Toolchain 7-2017-q4-major
  • nRF52 DK development board
  • Jumper 0.0.52

Go to the SDK’s blinky example, build it, and flash it:

$ cd nRF5_SDK_14.2.0_17b948a/examples/peripheral/blinky/pca10040/blank/armgcc/

$ make
mkdir _build
cd _build && mkdir nrf52832_xxaa
Assembling file: gcc_startup_nrf52.S
Compiling file: system_nrf52.c
Compiling file: main.c
Compiling file: boards.c
Compiling file: app_error.c
Compiling file: app_error_weak.c
Compiling file: app_util_platform.c
Compiling file: nrf_assert.c
Compiling file: nrf_strerror.c
Linking target: _build/nrf52832_xxaa.out
   text    data     bss     dec     hex filename
   2088     108      28    2224     8b0 _build/nrf52832_xxaa.out
Preparing: _build/nrf52832_xxaa.hex
Preparing: _build/nrf52832_xxaa.bin
DONE nrf52832_xxaa

$ sudo nrfjprog --family nRF52 -e
Erasing user available code and UICR flash areas.
Applying system reset.

$ sudo ~/projects/spikes/nrf52/nrfjprog/nrfjprog --family nRF52 --program _build/nrf52832_xxaa.hex
Parsing hex file.
Reading flash area to program to guarantee it is erased.
Checking that the area to write is not protected.
Programing device.

$ sudo ~/projects/spikes/nrf52/nrfjprog/nrfjprog --family nRF52 -r
Applying system reset.
Run.

And see its glory:

Blinky! (click for the action!)

Blinky! (click for the action!)

installing Jumper Virtual Lab

Conveniently, Jumper comes as a Python 2 module and can be installed via pip.

Follow the instructions here

Once it’s installed, let’s try it out:

$ jumper run --bin _build/nrf52832_xxaa.bin
Loading virtual device
.........^C%

Success! I guess.

Getting to Virtual Blinky

I mean, the previous command was clearly doing… something.

But it’s not a proper blinky yet, is it? I don’t know about you, but I didn’t see anything blinking at all.

Let’s change that!

Let’s build a simple blinky-simulation:

#!/usr/bin/python2

from jumper.vlab import Vlab

# this array holds the four LEDs' visualisation
LEDs=["..","..","..",".."]

def on_pin(number, level):
    """This function will be called back for each state change of a pin.
    In this case, we use it to simulate the visible behaviour of the nRF52 DK:
    the blinky example makes the DK's four LEDs bink.
    This function visualise these four leds"""

    # update the state of the simulated LEDs
    if level:
        LEDs[number-17] = "XX"
    else:
        LEDs[number-17] = ".."

    # show them in the terminal
    print("   " + LEDs[0] + "   " + LEDs[1])
    print("   " + LEDs[2] + "   " + LEDs[3])

    # go back up three lines, so we overwrite our previous rendering of the LEDs the next time around
    print("\033[3A")

# set up the device simulation
dir="."
fw_bin="_build/nrf52832_xxaa.bin"
v = Vlab(working_directory=dir)
v.load(fw_bin)

# register the callback which visualises the LEDs
v.on_pin_level_event(on_pin)

# run the simulation
v.start()

Once created, you can run it:

$python test.py

You'll see happy blinking XX's. Isn’t it pretty?

Verdict: so far, so cool

So there you have it: a simple device simulation in (generously) ten lines of code, which can be plugged right in place of a physical device.

Compared to where we were only a decade ago (and where most embedded development teams still are), this is pretty amazing.

The next installment of this post series will use Jumper for proper testing, and eventually place it in a complete CI workflow. I’m excited to see how well it’ll work. Are you?

Unit Testing Embedded C with Ceedling

If you're interested in getting started with unit testing for embedded applications and you'd like to read an excellent tutorial, you should check out this post by Dmitry Frank. It'll walk you through installing and configuring Ceedling (and therefore Unity and CMock) and through tests for a small example. It's well thought out and a good read.

Dmitry is a talented engineer from Russia. He's worked on a variety of embedded projects, including his own preemptive RTOS which has been used in the wild. You can learn more about him at his website.